Set Up Duplicacy on Pop!_OS 20.04
I had no backup plan.
I switched to Pop!_OS as my daily driver but I didn't yet move my files from my old MacBook Pro. Everything was backed up using Mac software, and I didn't have a plan for Linux backup.
On the Mac, I backed up locally to a 1 TB external USB 3.0 drive using Time Machine and off-site to Dropbox and Amazon S3 using Arq Backup. Yeah, it was overkill, but you can't put a price on data loss, especially 25 years of family photos and videos.
I also recently built a NAS system on my LAN for our family file storage, but it's not yet ready for backups, so I needed both a short term solution for my Linux laptop and a long term solution that I could use for all of our household backups.
It doesn't matter what your preferred backup software is but, in general, I follow these basic guidelines:
- Automate your backups on a regular schedule
- Have a local copy of your backups for quick retrieval (USB drive, NAS, etc.)
- Have an off-site/cloud copy of your backups for redundancy
- Check the integrity of your backups regularly
- Have a recovery plan. (Do you know how to recover your data, especially since your backup software was running on your now dead computer?)
After investigating a number of backup solutions, including TimeShift and Duplicati, I decided upon Duplicacy, mostly based upon community reviews.
Duplicacy is developed by Acrosync. If you're comfortable working with the command line, there is no cost for a CLI license since it's open source. Thanks, Acrosync.
While the core Duplicacy backup engine is open source, the web-GUI version is not, nor is it free. That's fine with me - I'm happy to contribute to open source projects through commercial offerings.
The pricing for a personal license is a little outside the norm - not quite SaaS, not quite a one-time purchase - but I ended up getting a 5-year license for $40.
The Duplicacy web-GUI version has a lengthy free trial period, so you have plenty of time to decide if it works for you.
Here's how to set it up.
Wizards and Magic
My experience with backup software has typically been wizard-driven:
[Launch backup software]
- What files would you like to backup?
- Where do you want to put those files?
- Do you want those files to be encrypted?
- How often do you want to backup?
- How long do you want to keep your backups?
[Save]
After that, everything just backs up automagically.
Duplicacy addresses all the same considerations, but instead of being wizard-driven, set up is performed using commands and configuration files. Luckily, I could ramp up quickly using the web-GUI version. I'll use this version for my laptop, but will use the command line version for backing up my NAS to the cloud.
Concepts
To get started with Duplicacy, you first need to understand some concepts and definitions. Again, wizard-driven backup solutions use these same concepts, but they're abstracted. In Duplicacy, they are explicit and uniquely configured. This approach took me a few minutes to get my head around, but now it makes perfect sense.
Repository
A Repository is the location of the files that you want to backup. (e.g. /home/yourdirectory or /etc/opt)
Snapshot ID
A Snapshot ID is a unique identifier for the repository you want to backup. For example, if you want to backup your home directory, you might give it a Snapshot ID of "Home."
Revision
After the first backup of a repository, each subsequent backup generates a Revision. A revision contains the changes (additions, deletions, edits) since the last backup (sometimes referred to as Incremental or Differential backup). Revisions provide faster backups and conserve disk space.
Storage
Where will you store your backups? You will need to initialize that storage by providing a path to the local or remote file system. If you're backing up off-site to cloud storage, you'll need to authenticate with that service before you can select it as a backup location. The process of authenticating Duplicacy varies based on the service you're using, so I won't cover that here.
Currently, Duplicacy supports the following backends:
- Local File System
- SFTP
- Dropbox
- Amazon S3 (or API equivalent)
- Wasabi
- DigitalOcean Spaces
- Google Cloud
- Microsoft Azure
- Backblaze B2
- Google Drive
- Microsoft OneDrive
- Hubic
- OpenStack Swift
- WebDav
You can find details and CLI commands on the Duplicacy Forum.
In my short term use case, I'll be backing up to a High Endurance Micro SD card (Local File System) every few hours and Google Drive each night.
When my NAS is properly set up, I plan to continue with the Micro SD card for hourly backups, use the NAS for nightly backups and use Amazon S3 Glacier for weekly off-site backups.
Backup
A Backup is defined as the collection of files or directories you want to backup and the location where you want to put them. In order to configure a Backup, you first need to have initialized your Storage.
Schedule
A Schedule contains the timing of your backups (Day, time of day, etc.) and the Backup job you want to run. You can have multiple schedules for the same backup, multiple backups in a single schedule, etc. In order to configure a Schedule, you first need to have initialized your Storage and created at least one Backup.
Prune
The Prune function is similar to step 5 in the wizard-driven software example above but again, you need to explicitly define it. To do this, you need to create a Schedule that runs a Prune job, select the appropriate Backup, then indicate the parameters for when to start pruning data.
Restore
You can restore your data from any shapshot contained in your backup library. Keep in mind that these are not bootable system backups - only your data. If your Linux installation doesn't have a bootable recovery partition, you may want to keep a bootable USB drive handy in case of system failure.
Additional Concepts
There are some additional concepts and commands that you may want to explore, but the above is enough to get you started.
Setting up Duplicacy
Installation
You have two options for installing the Duplicacy web version:
- Download a self-contained binary or;
- Build it from source.
I selected the easiest option and downloaded the binary for x64 systems. Once downloaded, I ran a checksum to ensure that it wasn't corrupted.
cd /home/gadgetboy/Downloads
sha256sum duplicacy_web_linux_x64_1.3.0
Next, I moved the application to /opt/Duplicacy
sudo mkdir /opt/Duplicacy
sudo mv /home/gadgetboy/Downloads/duplicacy_web_linux_x64_1.3.0 /opt/Duplicacy
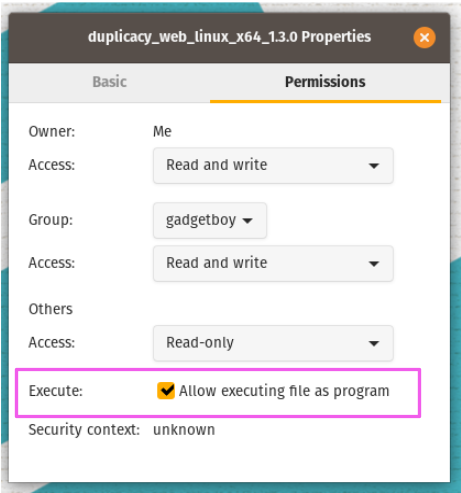
You also need to change permissions on the file so that it can be executed as a program. You can do this from the command line or using the Files application by right-clicking the file, selecting Permissions, then selecting the checkbox, "Allow executing file as program."
Launching Duplicacy at Startup
Even though Duplicacy is now ready to launch, you'll want to do one more thing: make sure Duplicacy launches after a restart. Otherwise, your automated backups won't run unless you remember to launch Duplicacy every time you reboot your machine.
Select the Activities menu in the Pop!_OS panel, in the top left corner. Select the Show Applications icon in the Dash, then find the Startup Applications app and launch it.
Click Add, then enter the name of the application. Next, enter the path of the application or select it by navigating to it by clicking Browse...
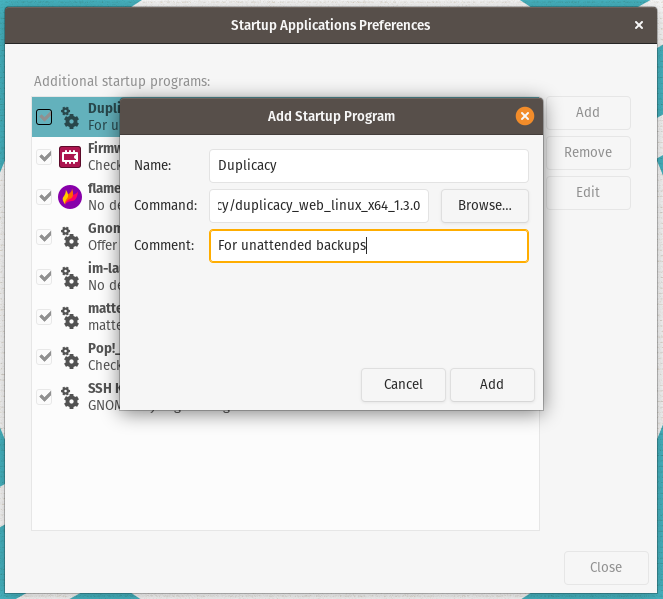
Optional: If you're not the only user or administrator of this machine, you may want to enter a comment so that other people know why it's set to run at startup.
Okay, we're finally ready to start backing up some files, so let's launch Duplicacy. It will load the control interface in your default web browser.
The Duplicacy web-GUI version runs a small web server so that you can setup and manage it using a web browser. By default, it responds only to requests from localhost at 127.0.0.1:3875. If you'd like to change this configuration so you can access it remotely, you can do that by selecting Setting in the toolbar. I'm going to focus only on the localhost use case in this post. Review this forum post if you'd like learn how to setup remote access.
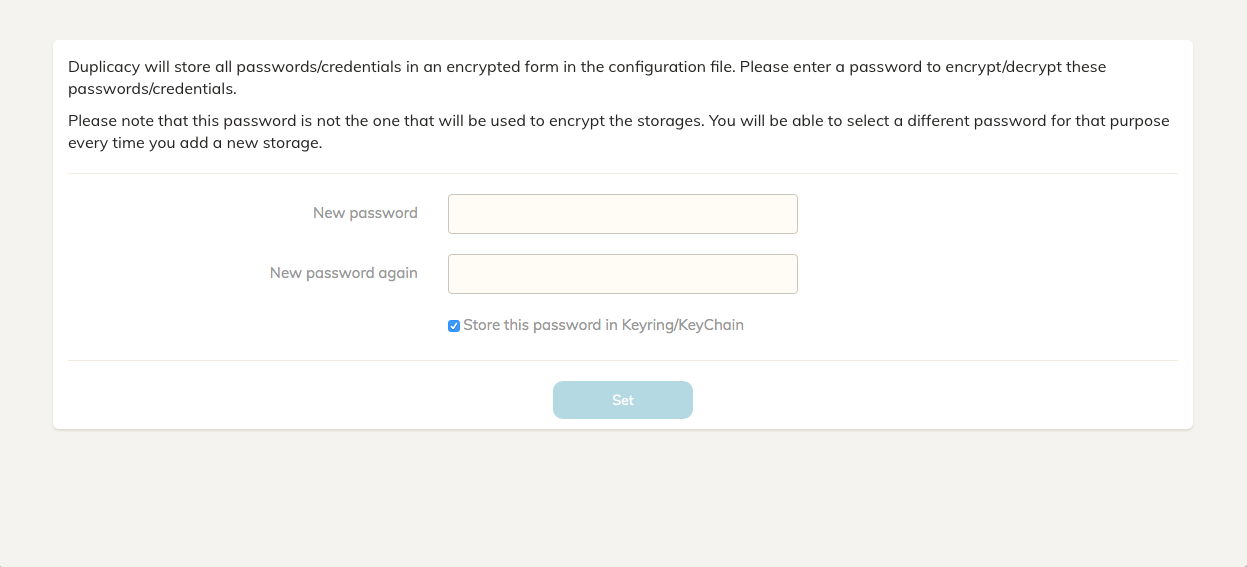
Application Password
Duplicacy will ask you to create a password to secure your credentials stored in local configuration files. You can choose to store this password in your Keychain. I use Bitwarden for all my passwords, so I unchecked this box.
You can click any of the images below to enlarge them.
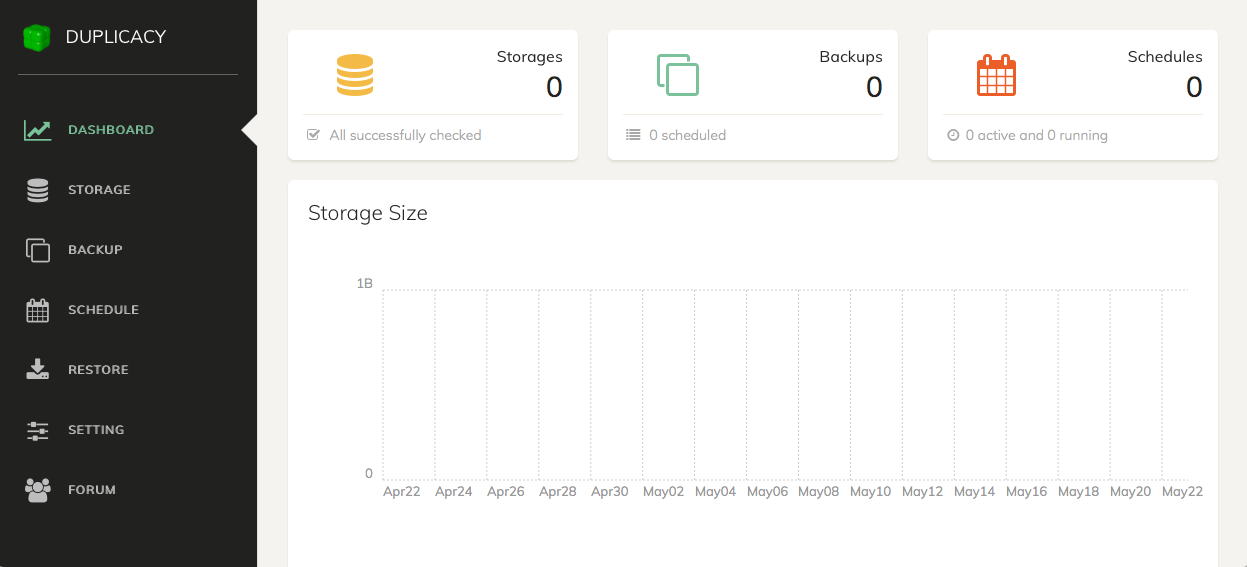
Once your password has been configured, Duplicacy will load the Dashboard. There's nothing yet to see here since we haven't yet initializied Storage, created a Backup or set a Schedule.
Identifying and Initializing Storage
To add a place to store your backups, select Storage from the toolbar, then select the "+" icon in the lower left corner of the screen. You'll be presented with the Storage configuration options.
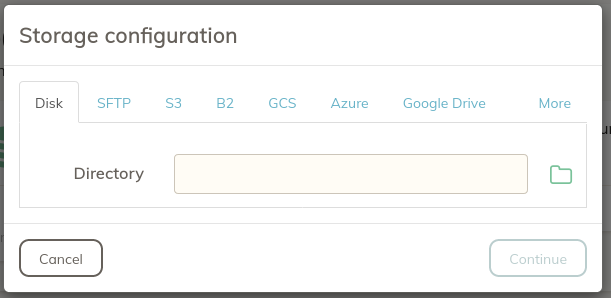
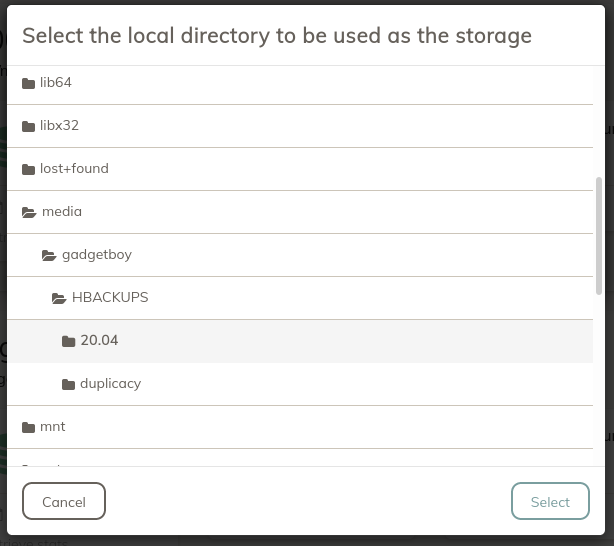
I'm going to continue on with own use case in this how-to, so I'll select a directory on my Micro SD card.
Finally, to initialize the Storage, you'll need to give it a name. You can optionally add a password used to encrypt your Storage (RECOMMENDED).
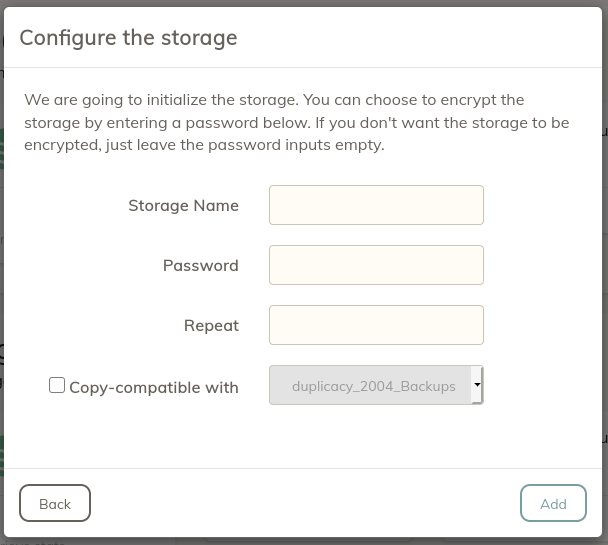
Optional: Select the Copy-compatible checkbox to explicitly indicate that the source Storage is compatible with the destination storage.
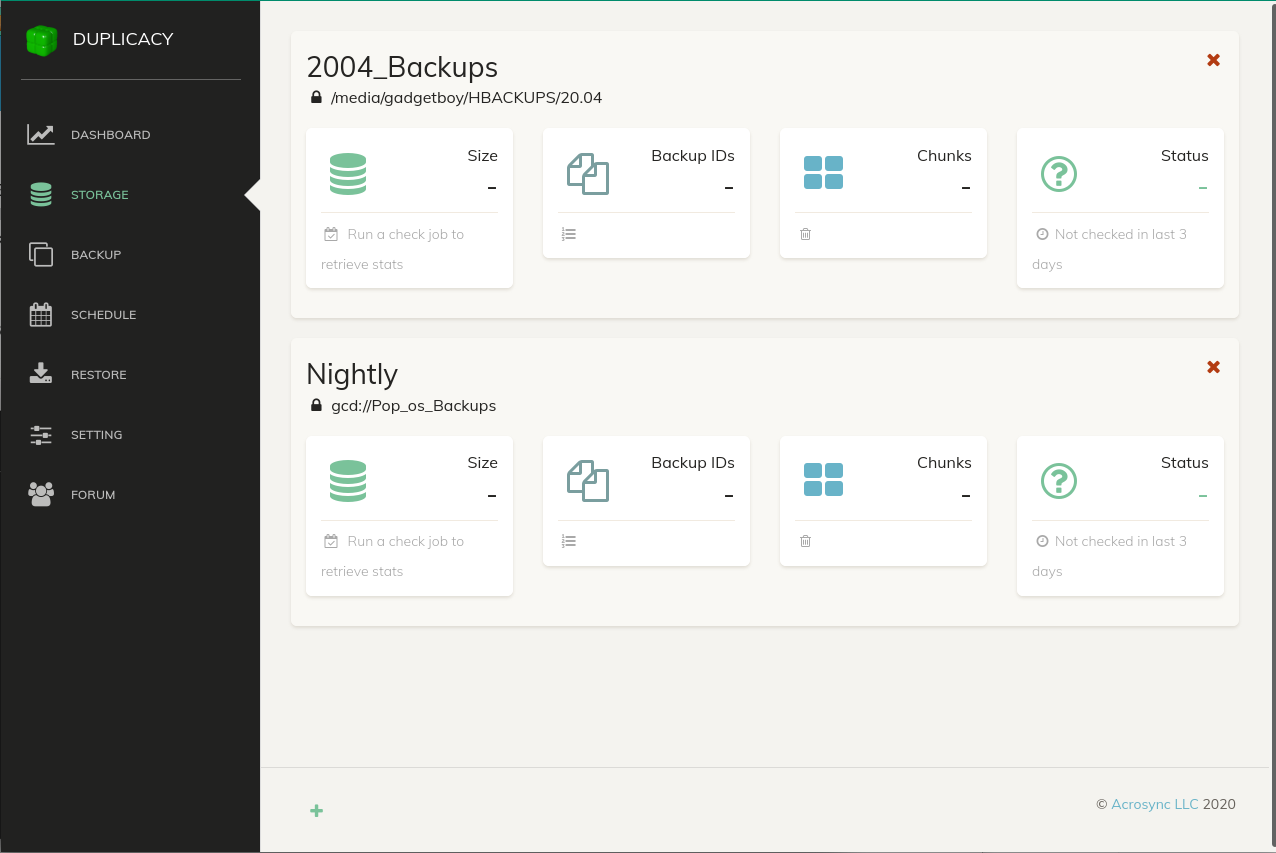
Execute this operation by clicking the Add button. Once completed, the Storage will appear when you select Storage from the toolbar. In the screenshot below, you'll see the storage for both my hourly backups to the Micro SD card ("2004_Backups") and my Nightly backups to Google Drive ("Nightly").
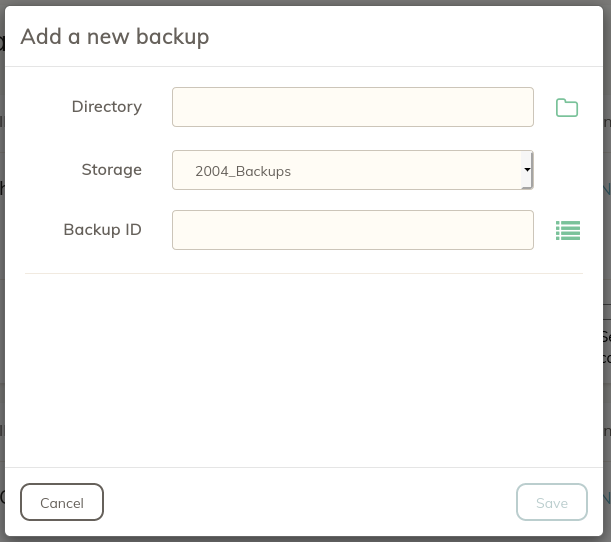
Defining a Backup
Select Backup from the toolbar, then click the "+" button in the upper right corner. Here, you'll select the Directory (your files) that you want to backup, the destination (the initialized Storage created above) and a Backup ID. Give your Backup ID a memorable name like "My_Home_Directory" or "My_Photos."
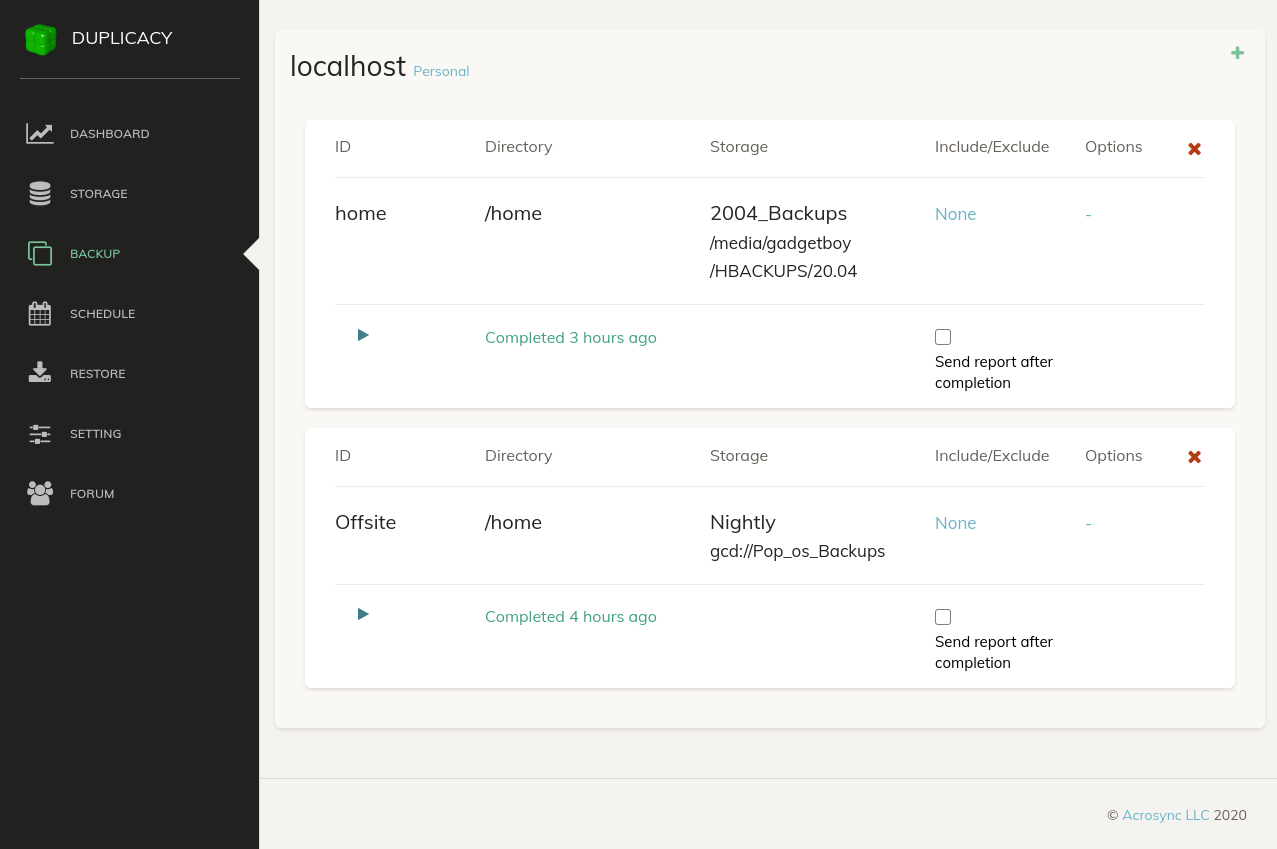
Save this configuration by clicking the Save button. You'll return to the Backup screen where you will now see your new Backup configuration. In the screenshot below, you'll see both my local Backup ("home") and my Google Drive Backup ("Offsite").
In theory, you could stop here. When you want to perform a backup, you could just click the green arrow/triangle below the Backup name, but we don't want to have to remember to do that - we want it to happen automatically.
Creating a Schedule
Select Schedule from the toolbar, then select the "+" icon in the lower left corner. Give your Schedule a name (e.g. "Nightly"), select the time of day you'd like it to start, select the frequency in which you want it to run, then select the day(s) of the week you would like it to run.

Optional: Select the Maximum Run Time. I don't particularly grok the use case for this. Perhaps if it's a production machine, like a file server, you'd want to make sure it's finished before 9 AM, when people start working. Or, maybe, if it's your laptop and you need to leave for work at a certain time, you want to make sure you don't interrupt the job and corrupt the backup. Someone with more experience will have to give me a real use case. Personally, I want the job to finish, no matter how long it takes.
Testing
This is the last and most important step in any backup plan. If you don't validate your backup, it's like not having a backup at all.
Click Backup from the toolbar.
Run a manual Backup job by clicking the green arrow icon. If this is your first time, go get a cup of coffee. Or a cocktail. It could take a while.
Once the job is completed, click Restore from the toolbar.

Select the initialized Storage where your backups are kept from the drop down menu, then select the Backup ID of your files. Now, select a Revision. This could be from any point in time as indicated by the time stamp at the end of each entry. Finally, indicate the directory where you'd like to put your restored files.
For information on Options, visit the Duplicacy forum.
After you've selected your revision, Duplicacy will present you with the files or directories contained within. Select the file or directory that you want to restore, then click the Restore button at the bottom of the screen.
Your files will be unpacked and copied to the directory you've specified above.
Review Your Files
Does everything look OK? Is anything missing? Are you able to open your files? Yes?
Congratulations! You've set up the Duplicacy web-GUI version to backup your files automatically.
The Check Job
You've now setup Duplicacy and performed a successful backup and restore of your data, but do you plan to do that after every backup?
Of course not.
To ensure Snapshot integrity, you'll want to run the Check command. You can run a Check at any time but it's probably best to schedule a Check job after a completed backup.
By default, the Check command will only verify that a referenced file chunk exists in your snapshots. If you want to automatically verify the integrity of each individual file, see this post on the Duplicacy forum for options.
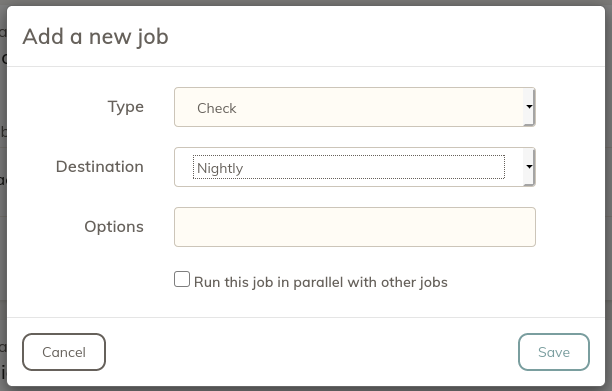
To setup a Check job, you can create a new schedule or add the job to an existing schedule. In my case, I've added it to my "Nightly" schedule so that it runs after each daily cloud backup.
Once your schedule is created, click the "+" icon to add a new job. Select Check from the drop down menu, then select which Destination you want to check. To learn more about Options, visit the forum post linked above.
Pruning
Technically, you're all set: your backups now run on an automated schedule and you can safely restore your data.
But unless you have unlimited storage, you'll probably only want to keep backups around for a certain length of time.
To configure this, we have to create a Prune job.
To recap, I backup my home directory to the Micro SD card every 4 hours. Then, each night, I backup my home directory to Google Drive. (That's two Storage locations, two Backup jobs and two Schedules, if you're keeping track.)
I created two daily Prune jobs for each referenced Backup.
To create a Prune job, select Schedule from the toolbar, then select the "+" icon in the bottom left of the main screen to create a new schedule. In my case, I prune both my local backups and my cloud backups every 7 days. Choose what works for your peace of mind and your storage limitations.
Give your schedule a logical name such as "Prune_Local" or "Prune_Cloud." If you intend to run multiple jobs in the same schedule, name the schedule accordingly.
Now, find your new schedule in the main screen and select the "+" icon to add a job to it. This is just like adding the Backup job that we covered above, but instead of selecting Backup from the drop down menu, we're going to select Prune.
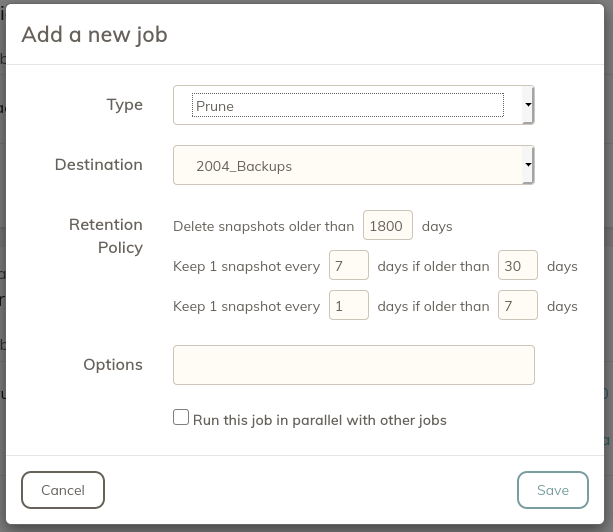
Next, select the Destination (your initialized Storage) that you want to Prune and configure your Retention Policy. Click Save to finish.
If you found this how-to helpful, pay it forward.